Showing posts with label Kids. Show all posts

Wednesday, June 1, 2016

Crochet Dolls

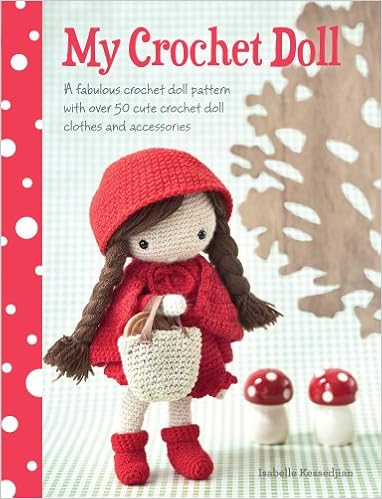
So I've made these dolls for each of my kids - they each got their own doll, supposed to look like them.  I also made a doll for myself.  I've been having a lot of fun lately making doll clothes.  I started with the patterns in the book shown and linked to below, but then I started making adjustments and playing around.  The hair on the boys for starters was my own idea.  I've also done lots of playing around with clothes.  I've got more pictures of outfits I've made for my doll and as I get stuff done, I will post more here.  


Wednesday, April 20, 2016

Ninja Turtle Cuddly

I made this fun little pattern for the baby of a friend of mine. She picked the yarn and pattern - I just did the crocheting - but I think it came out really cute!  Sorry for the awful picture - I just snapped a quick one with my phone before taking it over to her.    

She picked cotton yarn (instead of the poly blend that the pattern suggests) and while if you want to be able to wipe up stuff with it - that is a better choice, I think it made it a little harder to make.  The stiffness of the yarn (and this was some of the stiffest cotton I've used) made the amigurumi part tiring to make. When I make this again for my nephew, I will use a poly blend.  


You can find the pattern HERE

Along with a much better picture.  :)

Wednesday, June 19, 2013

Taz Quilt

I made this quilt for my nephew - his name is Taz and so I thought this fabric was perfect for him!  It's a pattern from Perfect for Precuts Volume 1 and it's called "Flower Show" It was a really easy quilt - easy to cut, easy to piece.  It's a twin size quilt - but it's a very large twin size!   This first photo shows the binding and you can just barely catch a glimpse of the awesome tazmanian devil swirls in the quilting.  I got it machine quilted by Susan Bateman.  I also made a matching pillowcase.  

Most of the prints are a set of fat quarters - but the blue fabric I got online and the orange fabric and green polka dot fabric are from Hobby Lobby


This one shows the pattern a bit better - I hand stitched the binding while on our way down to Texas and barely remembered to take a picture of the blanket before I sent it with my sister!


Monday, June 18, 2012

Road Trip!!

Now some of you may think that the prospect of a 14 hour car trip with 5 kids would scare any sane person out of their minds.  Which either means that I'm insane, or I know secrets!!!  We had a 14 hour (drive time) road trip planned for this summer.  My hubby was going to be travelling a lot this month, so once the kids were out of school, we packed our bags and headed south.  I love to surprise my kids on the day of the trip with fun goodies to help keep them entertained.  Between those goodies, movies, and my audio books - I was looking forward to a nice peaceful ride.  And believe it or not... I got it!  A few potty stops, a few food stops, but we made good time and there was little fighting or screaming!  YEY!  Really - when you think about it - when the kids are trapped in their seats and I have an audio book (so I can ignore the barbie movie they are watching for the 10th time) I'm one happy camper!  The only thing better is when my hubby is with  me so I can crochet and sew and listen to an audio book while he drives :P

Well to prepare for the trip, I made a few fun goodies for the kids - I started out by making these (click on the image to go to her blog for instructions) The kids LOVED these - they love to color and draw and can spend hours happily entertained with colored pencils and paper. The roughest part was cutting out the dvd holder part - get a couple extra cases if you are going to do it to practice on - you can find the cases pretty cheap and the cutting takes some practice (at least it did for me.)  I also went to Hobby Lobby for some matching fabric for the inside and paper for the outside.


I also made these - i love how they came out and the kids loved having them - i stuffed them with their coloring cases, and books and other goodies and they loved it.  I mostly used left over fabric from the big quilt we made for my sister-in-law and her family for Christmas.  I also used a sheet of plastic canvas to give it stability, and some batting that I used spray adhesive to attach to the plastic canvas.  The pockets were just pieces of fabric folded in half, seamed and stitched in place.  The handles were using the plastic-y canvas type handle stuff (I got it at hobby lobby in the fabric area) and melted the ends with a lighter to seal them.  Then i sewed one end into the seam at the top and added snaps to the other end.  I started writing up an actual pattern for this - and left it back home :)  I will include it with all the dimensions and stuff when i get back.


Saturday, May 5, 2012

Old Jean Made New

Ok so I have 5 kids, which means that I have a lot of jeans with holes in the knees.  With the weather warming up, my kids had a need of shorts and less need to holey jeans, so I took this weekend to do some re-furbishing.  I'm SOOO excited about how these turned out!!  All this was done with two pairs of my kids jeans and the leftovers of the Jelly Roll I used to make the table runner for my sister.  I started by making a double fold bias tape out of the fabric, and covered the edges and sewed them on about 1/8 in from the edge. (The butterfly and embroidery on the second pair was already there)  

The purse was done by using the bottom of one of the cut off legs.  I hemmed the bottom and covered it with another strip from the jelly roll.  I folded down the top and frayed the edge a bit - then using yarn, created the handles by threading it back and forth about 5 times - the single crocheting around them.  

For the headbands, I cut a strip of the leftover leg about an inch thick and took another strip from the jelly roll.  I put the wrong sides together and sewed about 1/4 inch from edge down both long sides.  The jelly roll piece was wider than the denim so when i turned it right side out and pressed it there was some of the colored fabric showing on the same side as the denim.  I then measured my kids head and put a strip of 3/4 inch wide elastic into the ends and hemmed them.  Sorry I didn't take pictures during the process, but I didn't think of it..... Anyway - what fun stuff can you do with your worn out clothing - now i just need to find time to do the rest of their holey stuff!  They were so excited about their "new" clothes!


If any of this is unclear, feel free to ask and I will try to do better - maybe when I work on the other pairs this week I can take more pictures for clarification.... :P

Wednesday, September 21, 2011

Floral Stripes 18-inch Doll Outfit

Ok - First up is this outfit which I made for my daughter for her birthday. The one I made was one pattern in a set of 3. I made the one on the left. Overall - I really liked the way the pattern worked. It was easy to understand, mostly simple stitches and turned out looking good. I got the pattern at Annie's Attic and used yarn that I got from Jo Ann's, Hobby Lobby and Walmart. My main gripe is that the printed version they sent me smudged when it got a bit damp (courtesy of one of my kids....)

I also added a lining to the purse. I basically took the purse pattern and made it again, but on the row where you stitch in back look only, I stitched in the front loop only, to put the pretty side on the inside :) I really like how the purse turned out with the lining

I also made a little bracelet which you can't see in the picture, because the purse is covering it.... I just made a chain as long as her wrist then joined it to make a circle. Then i sc in each stitch around. I made a small flower and attached it with a button. If I get around to it, I might even make a larger one for my daughter to match it.... :)

So here is how my attempt came out. I dressed up my daughters doll in the outfit and we had a little photo shoot :P The variegated yarn I used created a totally different look - but I still like it. I might even make this again in different colors for my next daughter... Oooo the joy of girls and making doll clothes!