Showing posts with label Crochet. Show all posts

Friday, August 27, 2021

A Tiny Doll and her Tiny House

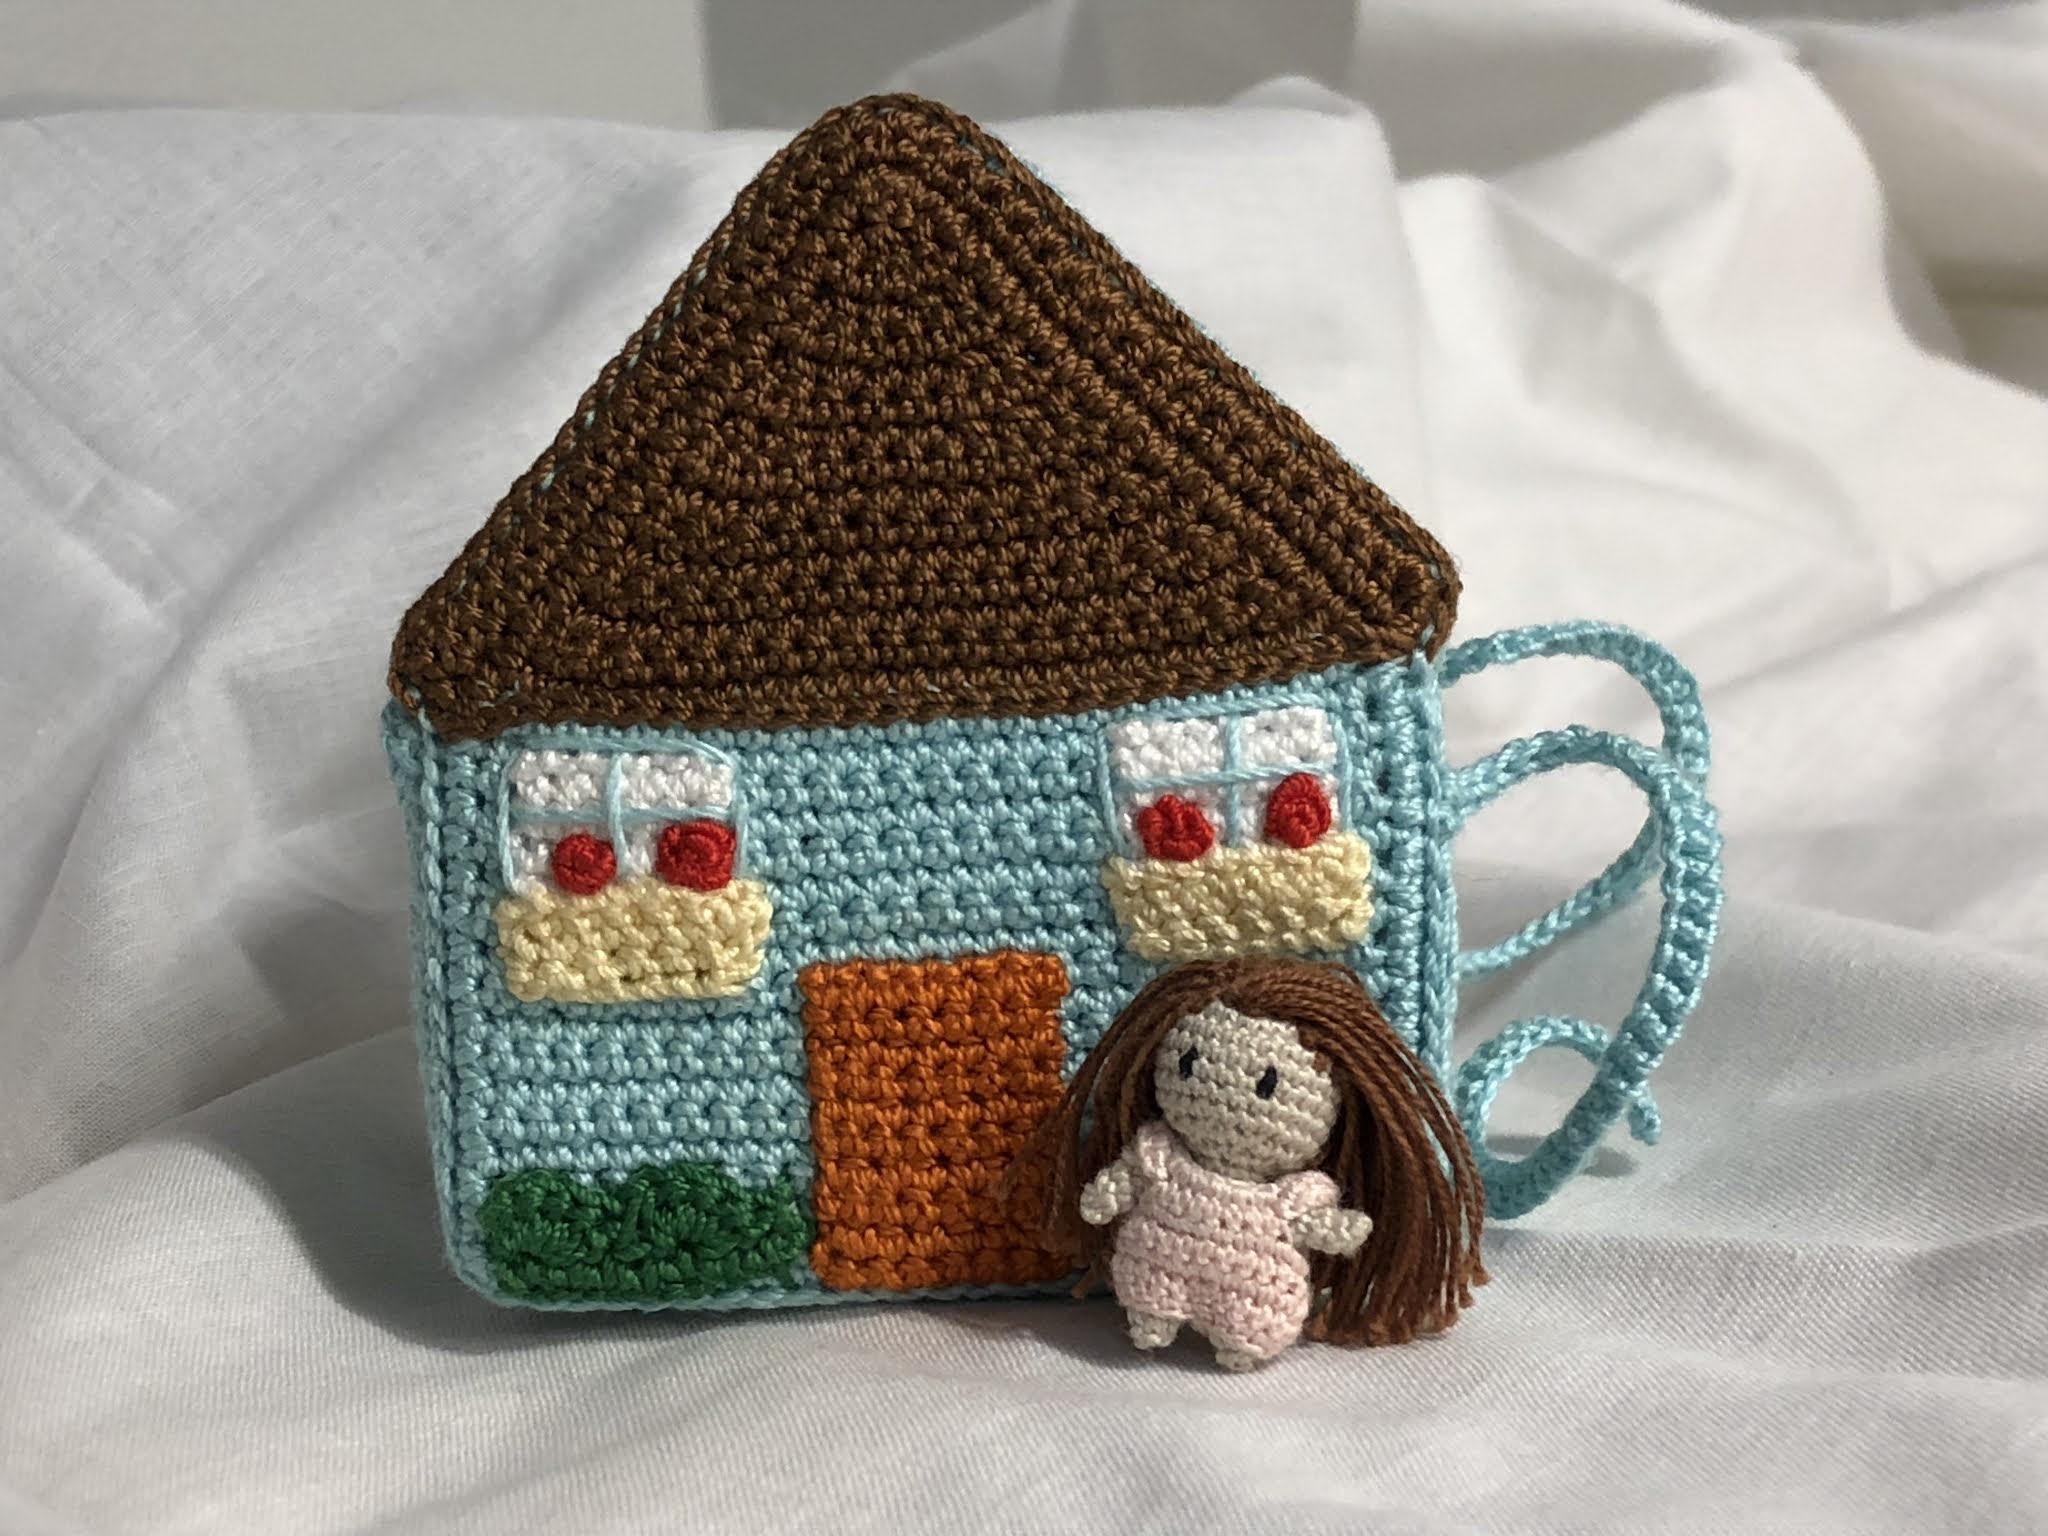
So I finally managed to pick out colors for this project and get it started, and once I got going, it went really quickly.  And I adore it!!!  I'm so happy with how it turned out.  I love Pink Mouse Boutique's patterns - you can find the pattern for this one here - her patterns make doing these tiny things seem totally possible.  And they are adorable.  I love my little house book!!  And so does my tiny doll! This doll isn't the doll pattern that comes with the house rather it is this one.  

As usual, I made some adjustments.  I didn't like the way the blanket looked with all the color changes, so I did some surface slipstitches to hide them and make it look prettier.  


I used some fuzzy yarn I have lying around to do the towel and I love it!  I also sc around the shower head to make it a bit bigger.  I love the little fridge and I'm thinking maybe I'll play around and try to make some more food to put in there.   


I did a little dotted trail behind the butterfly, which I thought was a really cute idea... but it's hard to see.  


 Over all, I love this pattern and this darling little doll house - I'm debating trying to upsize it for bigger dolls...  She adds a ton of pictures and well written instructions.  Also, she is wonderful about updating patterns when she does updates.  I also got her Sophie doll pattern and made the doll, but she recently updated it with some new accessories, and she was wonderful about getting me the updated one!  I'm looking forward to adding to her stuff and once I get it finished, I'll post it here!  

Monday, July 31, 2017

Little Mermaids

So I made mermaid tails for each of my kids crochet dolls and for my own doll, then I got my daughter to set up an underwater scene for the dolls - a friend who makes doll stuff with me also joined our little under water party and we had some fun with a photo session!  I think it came out so cute!  I started with the free pattern on the Red Heart website - but I adjusted it some.  I used fingering weight yarn and instead of working it in one square piece and then closing up the seam, I worked the top in a flat piece and added a snap at the top and worked the tail part in a round.  I used some pretty variegated sock yarn to get some really cute scale looking tails for the dolls.  I can add the specifics of my changes if anyone is interested!  


Wednesday, June 1, 2016

Crochet Dolls

So I've made these dolls for each of my kids - they each got their own doll, supposed to look like them.  I also made a doll for myself.  I've been having a lot of fun lately making doll clothes.  I started with the patterns in the book shown and linked to below, but then I started making adjustments and playing around.  The hair on the boys for starters was my own idea.  I've also done lots of playing around with clothes.  I've got more pictures of outfits I've made for my doll and as I get stuff done, I will post more here.  


Wednesday, April 20, 2016

Ninja Turtle Cuddly

I made this fun little pattern for the baby of a friend of mine. She picked the yarn and pattern - I just did the crocheting - but I think it came out really cute!  Sorry for the awful picture - I just snapped a quick one with my phone before taking it over to her.    

She picked cotton yarn (instead of the poly blend that the pattern suggests) and while if you want to be able to wipe up stuff with it - that is a better choice, I think it made it a little harder to make.  The stiffness of the yarn (and this was some of the stiffest cotton I've used) made the amigurumi part tiring to make. When I make this again for my nephew, I will use a poly blend.  


You can find the pattern HERE

Along with a much better picture.  :)

Sunday, June 23, 2013

Baby Kai's Blanket

My sister just had a new baby and for her new baby girl, I made this beautiful blanket, hat, booties, and sweater set - I really love how it turned out and the soft yarn was wonderful!  I really only made one change to the pattern.  The blanket had fringe on the top and bottom, but I didn't like the raw edge look of the sides - so I added a row of single crochet along the two sides and I really liked the way it looked with that edge MUCH better!  I wish that I had made the had a looser stitch, because it ended up being a bit small for her.  :(  


I got the pattern from a book called "Dressing Up Baby" and I can't wait to try another pattern from the book!  


Sunday, March 24, 2013

Baby Blankets!!!

Well I have a lot of friends having babies - and since (for once) I'm NOT having one too - I am having fun making baby blankets for them! This is the first one I finished for one of my online scrapping buddies - she's having a little boy!


The pattern is from this book - I got it at JoAnn's but if you click the image it will take you to where you can get it at Annie's Attic.  It was a fun pattern to work and the edging was unique in the way it went together.  The only problem I had with it was in the first round of the edging (the round of single crochets that is the foundation for the rest) it has you do 2 more stitches than my math tells me is necessary for the edge - if you follow the directions, you will end up with 502 sc's around the outside - however to work with the rest of the edging (and to avoid pulling out a half finished round because it didn't work out right - and your hair along with it) you need 500 - once i figured that out and made marks all over my pattern to remind myself if I make this again - It was an easy and fun pattern.  Hopefully my friends little boy enjoys it as much as I enjoyed making it.  I used Bernat Baby Coordinates Yarn - the boucle type yarn - in blue green and white.  The blanket came out so soft and snuggly!  I think it took 3 skeins..... 


I've been working on lots of stuff and even finished some of it, and maybe I'll get around to getting some of it posted here.  :) 

Monday, January 2, 2012

Scarves

This pattern was part of another kit from the Hook and Needle club through Annie's Attic. The kit came with 3 different scarf patterns, but after making this scarf, I enjoyed it so much I wanted to make it again. This first picture is the scarf I made using (mostly) the yarn I was given and (mostly) the pattern I was given. I accidentally did the first couple rows different from the pattern, but ended up preferring it that way. The pattern asked me to do 2 rows of sc after the beginning ch and then no rows of sc on the other side. Instead I did mine with the chain right in the middle and a row of sc on either side. Also - I didn't worry about gauge since it was a scarf, but that ended up being a problem since I ran out of yarn.... So i found a fuzzy yarn that was the same color and did the border round with that.


I ended up liking the fuzzy yarn look a lot, so I found some spare yarn I had lying around and modified the pattern a bit and made this scarf. Both scarfs used a bit more than a skein of yarn total.


Ok here is how I made the second scarf - the first one wasn't my own pattern - though mine was heavily based off of it. Click on the image - then right click and choose "Save Image As"

Saturday, November 5, 2011

Tissue Holder

This is a fun little project that makes a great gift and is quick and easy to make. This was another piece that I made for my sisters diaper bag. The one I made for her was sized larger to hold plastic bags (which are very convenient for a mommy who doesn't want to carry around soiled clothes loose in the diaper bag or a stinky diaper loose when a garbage can is hard to find) The basic pattern is easy enough to alter to fit your purpose. The size as it is in the pattern is just the right size for a travel size package of kleenex. This keeps them from scattering all over your purse or diaper bag :)


I meant to get this picture posted with this pattern, but the moving and getting internet up took longer than we had hoped (since we both got sick) and was soon followed by sewage back up problems that we have had our hands full getting fixed.... but better late than never - this is what my finished project looked like and now I have a nice set for the baby shower I'm going to later this month. :)

Sunday, October 2, 2011

Baby Accessories

So this bottle cozy is another pattern that is a great baby shower gift. It can be finished in a day and takes less than a skein of yarn. I made this one for an Avent bottle - which is one of the bigger bottles. It can easily be adjusted for smaller or taller bottles, and how to adjust it is included in the pattern. This could also be modified bigger to make a gift cozy for a bottle of wine or sparkling cider (lol - I don't drink) :)

As usual, if you have any problems with the pattern or questions about it, feel free to leave a comment here.
This is a close up of the top decorative edge of the holder.

You can download a pdf of this pattern here

Or you can click on this jpeg and then right click and choose 'save image as'

Friday, September 30, 2011

Diaper Bag and Accessories

I saw this diaper bag set shortly after I found out that my younger sister was pregnant with her first baby. I wanted to spoil her, and thought that a good gift would be this diaper bag, stuffed with all the things a new mom needs. This pattern was in the March 09 issue of Crochet!

The first thing that needed to be altered was the colors. I wasn't a huge fan of the bright colors. :) I found some of the instructions hard to understand - mostly when it came to putting the thing together, so I just kinda played around with it until I liked it. I also changed how I did the lining. I made it a bit more complicated, but I think a bit nicer looking too. The pattern suggests just taking a piece of fabric and folding it in half. I actually went to the effort of making the lining fit to the shape of the diaper bag. The pattern also included a changing pad which was a great quick and easy project.


In addition to the pieces of the pattern, I made a few other pieces to go with this set that would also make GREAT quick and easy baby shower gifts. Some of them are shown here in the picture - this was my finished set that I sent off to my sister. I love how it came out - I don't know that I would go to the trouble of the full set for anyone other than my sister, but I really like the finished product.


So I thought I would type out the patterns for the other pieces I made and make them available to you. LOL - this may take a bit of time, but here is the first. The first one is a diaper and wipes carrier. A friend of mine (with more sewing ability than I will ever have...) gave me something like this for a baby shower gift. I LOVED it. I loved having something with diapers and wipes together that I could just grab and take, without having to drag the full diaper bag along if I didn't want to. This carrier will fit a travel wipes case and 4-5 diapers up to size 6. I swear, the button matches better in person.... the flash of the camera seemed to make the greens totally different!


Snag the pattern here as a jpeg - just click on it - then right click and choose 'save image as'


I don't feel comfortable giving the diaper bag pattern out - it isn't my pattern. :( (though I wish it were - lol - but I'm not that clever!) The way I got the pattern from such an old magazine is by signing up for the digital subscription to Crochet! Magazine - it's very inexpensive for a year subscription - plus you can download the back issues too - for me it was SOO worth it - that ended up being over 25 magazines for only $16 - if you want to check it out click here

This pattern is now being offered for free - you can go download it here

Friday, September 23, 2011

Baby Booties and Hat

A friend of mine signed up for the Hook and Needle club through Annie's Attic. She found herself unable to do some of the kits and let me have a few. One of the kits I got was this set of baby booties and hat. Now, the kit comes with instructions for both knit and crochet, but I don't knit well, so I chose crochet. :)

I wasn't crazy about the yarn they sent with the kit - but I don't think I would have minded it so much if the gauge had required a smaller stitch. I like my baby booties to be a tighter and firmer stitch than the patter and gauge allowed - this might have been less noticeable with different yarn, but the combination wasn't my favorite. Despite this, I think they came out cute!

I did do some adjustments to the pattern. The center of the Mary Jane booties was a bit off, so I changed the counting a bit to keep the center of the sock in line with the center of the toe. I also changed the way I did the hat. The pattern had it worked in rows as a flat piece, then had it sewn together to make the round. I worked the piece in rounds - didn't want to make more work for myself than necessary.... I think it worked just fine. I really liked the way the moccasins came out and almost wish I could make myself a pair... :)

I didn't include the moccasins in the picture because I had already given them to a friend with a new baby - I barely remembered to take this pic before I sent the rest off to another friend!

This pattern is only available through the Hook and Needle club and can't be bought on it's own. (At least not as far as I could find!)

I think that if I attempt these again, I will use different yarn, and try a double sole for more stability.

Wednesday, September 21, 2011

Ripple Throw

This was a project for my mother-in-law. I started out by looking at a bunch of ripple patterns, but was unable to find anything I liked. Most of the ones I saw were really ornate, and we had picked out this beautiful boucle yarn that didn't need a fancy stitch. I ended up just making up my own pattern as I went and really liked the way it turned out.

I am perfectionist when it comes to my crocheting, which can mean a LOT of stitches taken out :) What I found about working with the boucle yarn is that it is much more forgiving of accidents. I ended up leaving a lot of mistakes in there because the boucle yarn made them invisible. If you have never worked with these fancy yarns before (and are maybe a bit scared by them) give them a try! They take some getting used to - but are fun once you get going.

I have tried to type the pattern up for you - however I am inexperienced as a pattern writer - so if you give it a try and find problems, or have questions - feel free to leave a comment here and let me know!

The finished size was about 52" x 70" and I used a bit more than 2 Skeins of Sensations Rainbow Boucle Patterns Yarn - The Skeins are 11 oz each - I would say I used less than 30 oz of the yarn.

The pattern is a PDF file - you can download it here

And if the download is giving you trouble - here is the jpeg. Just right click the image and select "save image as"

Floral Stripes 18-inch Doll Outfit

Ok - First up is this outfit which I made for my daughter for her birthday. The one I made was one pattern in a set of 3. I made the one on the left. Overall - I really liked the way the pattern worked. It was easy to understand, mostly simple stitches and turned out looking good. I got the pattern at Annie's Attic and used yarn that I got from Jo Ann's, Hobby Lobby and Walmart. My main gripe is that the printed version they sent me smudged when it got a bit damp (courtesy of one of my kids....)

I also added a lining to the purse. I basically took the purse pattern and made it again, but on the row where you stitch in back look only, I stitched in the front loop only, to put the pretty side on the inside :) I really like how the purse turned out with the lining

I also made a little bracelet which you can't see in the picture, because the purse is covering it.... I just made a chain as long as her wrist then joined it to make a circle. Then i sc in each stitch around. I made a small flower and attached it with a button. If I get around to it, I might even make a larger one for my daughter to match it.... :)

So here is how my attempt came out. I dressed up my daughters doll in the outfit and we had a little photo shoot :P The variegated yarn I used created a totally different look - but I still like it. I might even make this again in different colors for my next daughter... Oooo the joy of girls and making doll clothes!